IBM Quantum Challenge: Spring 2023 参加記録
はじめに
5/17 - 5/25 の9日間で開催されたIBM Quantum Spring Challenge 2023 に参加しました。その記録です。
Lab1
Dynamic Circuit (動的回路)を使おうのLab。
動的回路とは、量子回路の途中で測定を行い、その測定結果によって量子演算を作用させるかさせないかを動的に決めれる回路のこと。要はif文が量子回路で使える。
リファレンス
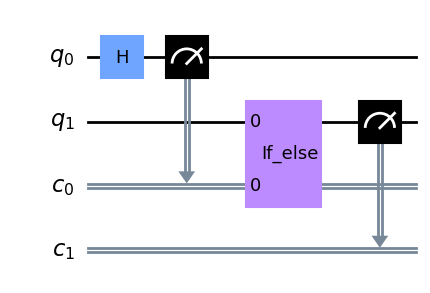
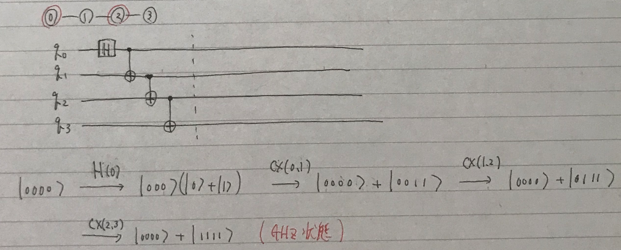
Exercise 1
量子回路で使えるif文である if_test を使うエクササイズ。
実行のたびに量子ビットと古典ビットの名前が変わって嫌だったので、少しプログラムを変更した。
量子ビットと古典ビットに名前をつけたいなら、QuantumRegisterオブジェクトの第2引数nameに指定すれば、実行のたびに0から連番してくれて嬉しくなる。
qr = QuantumRegister(2, "q")
cr = ClassicalRegister(2, "c")
qc = QuantumCircuit(qr, cr)

q0, q1 = qr
b0, b1 = cr

qc.h(q0)
qc.measure(q0, b0)

####### your code goes here #######
with qc.if_test((b0, 0)) as else_:
    # q0 の測定値が 0 なら q1 に X ゲートを適用する
    qc.x(q1)
with else_:
    # q0 の測定値が 1 なら q1 にアダマールゲートを適用する
    qc.h(q1)

qc.measure(q1, b1)
qc.draw(output="mpl", idle_wires=False)
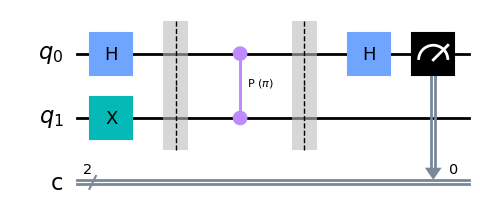
Exercise 2
言われたとおりに実装するだけ。
def trial(
    circuit: QuantumCircuit,
    target: QuantumRegister,
    controls: QuantumRegister,
    measures: ClassicalRegister,
):
    """Probabilistically perform Rx(theta) on the target, where cos(theta) = 3/5."""

    ####### your code goes here #######
    # Step1
    circuit.h(controls)
    circuit.h(target)

    # Step2
    circuit.ccx(controls[0], controls[1], target)

    # Step3
    circuit.s(target)

    # Step4
    circuit.ccx(controls[0], controls[1], target)

    # Step5
    circuit.h(controls)
    circuit.h(target)

    # Step6
    circuit.measure(controls, measures)

qc = base.copy_empty_like()
trial(qc, target, controls, mid_measure)
qc.draw("mpl", cregbundle=False)
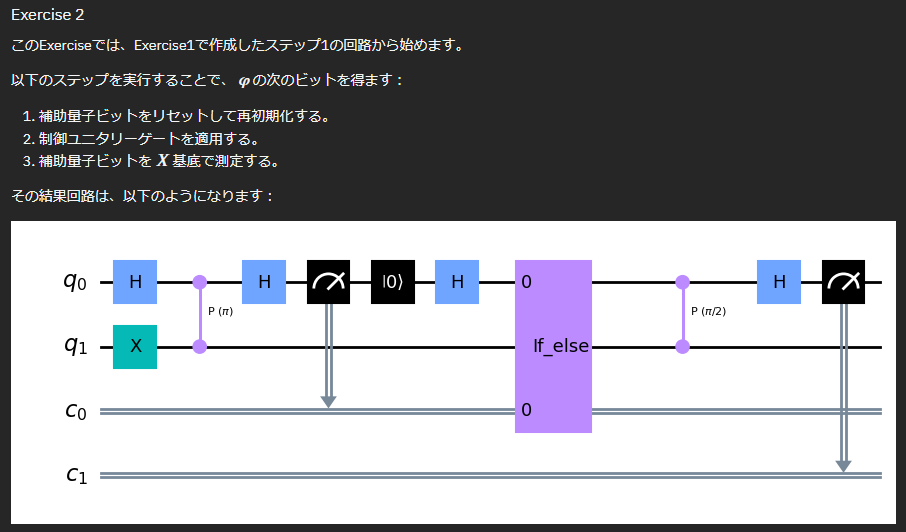
Exercise 3
if_test を使って、測定結果が1だったらXゲートを適用させる回路を作る。
def reset_controls(
    circuit: QuantumCircuit, controls: QuantumRegister, measures: ClassicalRegister
):
    """Reset the control qubits if they are in |1>."""

    ####### your code goes here #######
    with circuit.if_test((measures[0], 1)) as else_:
        # measures[0] == 1 => Xゲート適用
        circuit.x(controls[0])
    with circuit.if_test((measures[1], 1)):
        circuit.x(controls[1])

qc = base.copy_empty_like()
trial(qc, target, controls, mid_measure)
reset_controls(qc, controls, mid_measure)
qc.measure(controls, mid_measure)
qc.draw("mpl", cregbundle=False)

Exercise 4
# Set the maximum number of trials
max_trials = 2

# Create a clean circuit with the same structure (bits, registers, etc)
# as the initial base we set up.
circuit = base.copy_empty_like()

# The first trial does not need to reset its inputs, since the controls
# are guaranteed to start in the |0> state.
trial(circuit, target, controls, mid_measure)

# Manually add the rest of the trials.  In the future, we will be
# able to use a dynamic `while` loop to do this, but for now, we
# statically add each loop iteration with a manual condition check
# on each one.  This involves more classical synchronizations than
# the while loop, but will suffice for now.
for _ in range(max_trials - 1):
    reset_controls(circuit, controls, mid_measure)
    with circuit.if_test((mid_measure, 0b00)) as else_:
        # This is the success path, but Qiskit can't directly
        # represent a negative condition yet, so we have an
        # empty `true` block in order to use the `else` branch.
        pass
    with else_:
        ####### your code goes here #######
        circuit.x(target)
        trial(circuit, target, controls, mid_measure)

# We need to measure the control qubits again to ensure we
# get their final results; this is a hardware limitation.
circuit.measure(controls, mid_measure)

# Finally, let's measure our target, to check that we're
# getting the rotation we desired.
circuit.measure(target, final_measure)

circuit.draw("mpl", cregbundle=False)

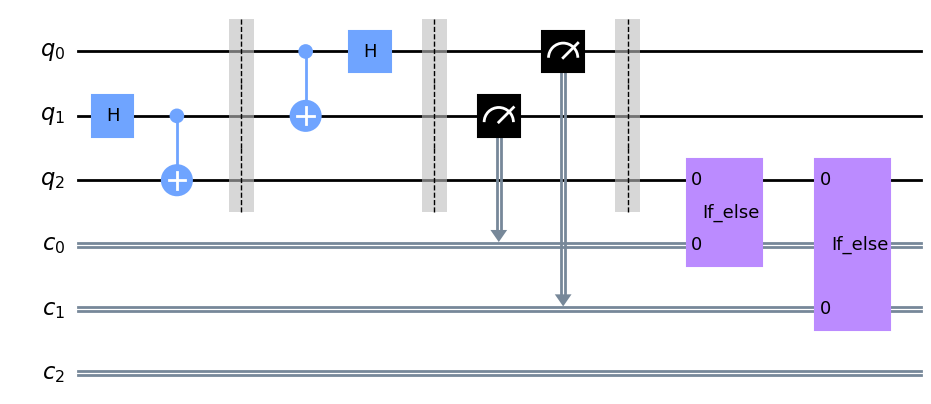
Lab2
量子テレポーテーションのLab。
Exercise 1

from qiskit import QuantumCircuit, QuantumRegister, ClassicalRegister
from qiskit.circuit import Qubit, Clbit


def create_bell_pair(qr: QuantumRegister, cr: ClassicalRegister) -> QuantumCircuit:
    """Creates a bell pair between qubits a and b."""
    qc = QuantumCircuit(qr, cr)
    # unpack qubits
    # the first qubit is s but we won't be using it in this exercise
    _, a, b = qr

    ####### your code goes here #######
    qc.h(a)
    qc.cx(a,b)

    return qc
qr = QuantumRegister(3, name="q")
cr = ClassicalRegister(3, name="c")
qc = create_bell_pair(qr, cr)

qc.draw("mpl")

Exercise 2
def alice_gates(qr: QuantumRegister, cr: ClassicalRegister):
    """Creates Alices's gates"""
    qc = create_bell_pair(qr, cr)
    qc.barrier()  # Use barrier to separate steps
    s, a, b = qr

    ####### your code goes here #######
    qc.cx(s, a)
    qc.h(s)

    return qc
qc = alice_gates(qr, cr)
qc.draw("mpl")

Exercise 3
def measure_and_send(qr: QuantumRegister, cr: ClassicalRegister):
    """Measures qubits a & b and 'sends' the results to Bob"""
    qc = alice_gates(qr, cr)
    qc.barrier()  # Use barrier to separate steps
    s, a, b = qr
    c0, c1, c2 = cr

    ####### your code goes here #######
    qc.measure([a,s], [c0,c1])

    return qc
qc = measure_and_send(qr, cr)
qc.draw("mpl", cregbundle=False)

Exercise 4

def bob_gates(qr: QuantumRegister, cr: ClassicalRegister):
    """Uses qc.if_test to control which gates are dynamically added"""
    qc = measure_and_send(qr, cr)
    qc.barrier()  # Use barrier to separate steps
    s, a, b = qr
    c0, c1, c2 = cr

    ####### your code goes here #######
    with qc.if_test((c0,0)) as else_:
        pass
    with else_:
        qc.x(b)

    with qc.if_test((c1,1)):
        qc.z(b)

    return qc
qc = bob_gates(qr, cr)
qc.draw("mpl", cregbundle=False)
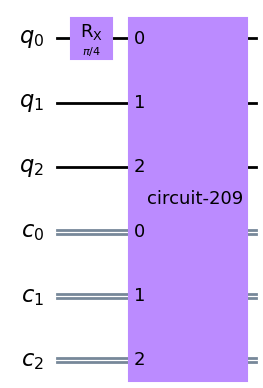
Exercise 5
import math

teleport_superposition_circuit: QuantumCircuit

####### your code goes here #######
def ex5_circuit(teleportation_circuit: QuantumCircuit) -> QuantumCircuit:
    qr = QuantumRegister(3, name="q")
    cr = ClassicalRegister(3, name="c")
    qc = QuantumCircuit(qr, cr)
    qc.rx(math.pi/4, qr[0])

    qc.append(teleportation_circuit.to_instruction(), qr, cr)
    return qc

teleport_superposition_circuit = ex5_circuit(teleportation_circuit)

# Uncomment this line to draw your circuit
teleport_superposition_circuit.draw("mpl", cregbundle=False)
ヒストグラムを表示する。
from qiskit import transpile
from qiskit_aer import AerSimulator
from qiskit.visualization import plot_histogram

sim = AerSimulator()
transpiled_circuit = transpile(teleport_superposition_circuit, sim)

# run job
shots = 1000
job = sim.run(transpiled_circuit, shots=shots, dynamic=True)

# Get the results and display them
exp_result = job.result()
exp_counts = exp_result.get_counts()
plot_histogram(exp_counts)

ボブの測定値だけのヒストグラムを作りたい場合、marginal_counts を使うといいらしいという学び。
# trace out Bob's results on qubit 2
from qiskit.result import marginal_counts

bobs_counts = marginal_counts(exp_counts, [qr.index(b)])
plot_histogram(bobs_counts)

Lab3 反復位相推定
今回のChallengeの最難関ともいえる。
ipynbのソースと説明文を読んでも頭に入らないとき、紙に写経してまとめるとすっと理解できることがある。
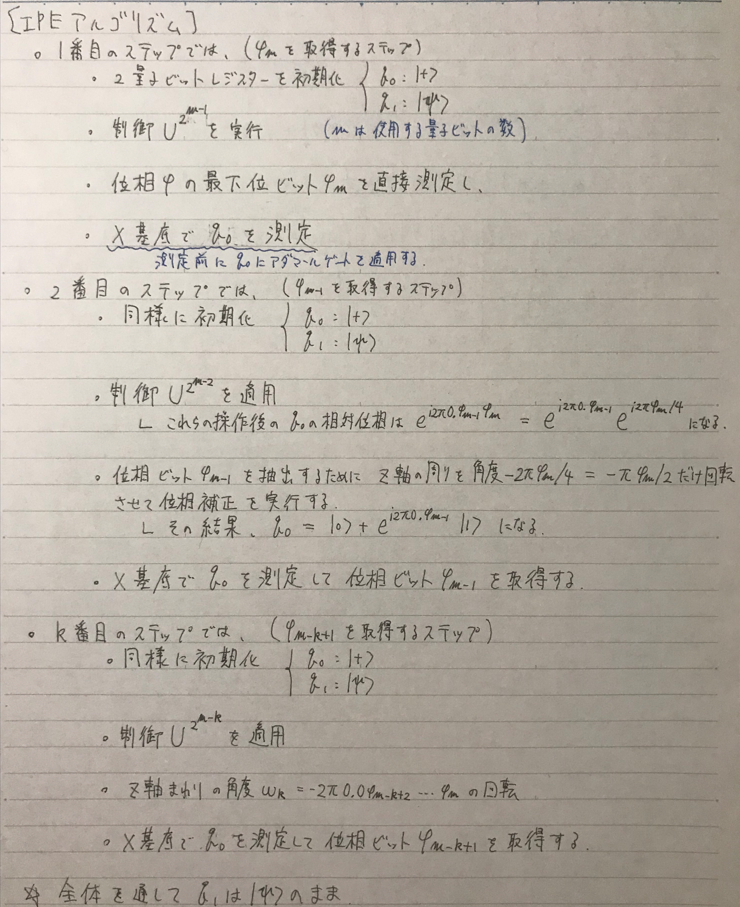

Exercise 1
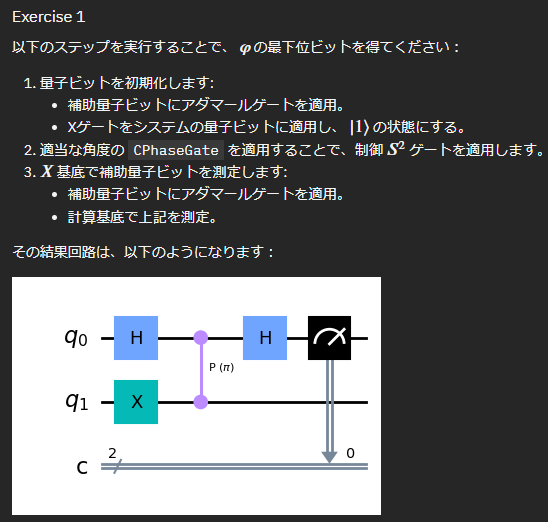
from qiskit import ClassicalRegister, QuantumCircuit, QuantumRegister
import numpy as np


def step_1_circuit(qr: QuantumRegister, cr: ClassicalRegister) -> QuantumCircuit:
    # qr is a quantum register with 2 qubits
    # cr is a classical register with 2 bits

    qc = QuantumCircuit(qr, cr)

    ####### your code goes here #######
    # 1.初期化
    qc.h(qr[0]) # 補助量子ビット
    qc.x(qr[1]) # ターゲット量子ビット
    qc.barrier()

    # 2.制御S^2ゲートを適用する
    qc.cp(np.pi, qr[0], qr[1])
    qc.barrier()

    # 3.X基底で補助量子ビットを測定
    qc.h(qr[0])
    qc.measure(qr[0], cr[0])

    return qc


qr = QuantumRegister(2, "q")
cr = ClassicalRegister(2, "c")
qc = QuantumCircuit(qr, cr)
qc = step_1_circuit(qr, cr)
qc.draw("mpl")
Exercise 2
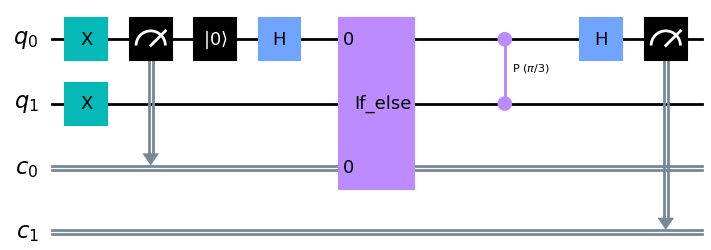
def step_2_circuit(qr: QuantumRegister, cr: ClassicalRegister) -> QuantumCircuit:
    # qr is a quantum register with 2 qubits
    # cr is a classical register with 2 bits

    # begin with the circuit from Step 1
    qc = step_1_circuit(qr, cr)

    ####### your code goes here #######
    # 1.補助量子ビットをリセットして再初期化
    qc.reset(qr[0])
    qc.h(qr[0])

    # 2.制御ユニタリーゲートを適用する
    qc.cp(np.pi/2, qr[0], qr[1])

    # Z軸の周りを角度 (-pi φ_m)/2 で位相補正する
    with qc.if_test((cr[0], 0)) as else_:
        # 0を測定すれば、角度0度なので何もしない
        pass
    with else_:
        # 1を測定すれば、-pi/2 で位相補正する
        qc.rz(-np.pi/2, qr[0])


    # 3. X基底で測定する
    qc.h(qr[0])
    qc.measure(qr[0], cr[1])

    return qc


qr = QuantumRegister(2, "q")
cr = ClassicalRegister(2, "c")
qc = QuantumCircuit(qr, cr)
qc = step_2_circuit(qr, cr)
qc.draw("mpl")

Exercise 3
かなり詰まった。
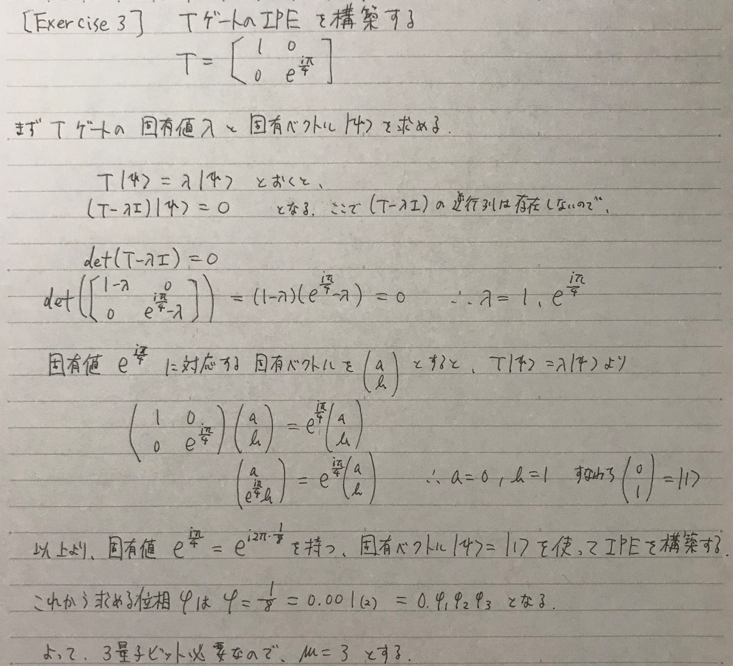

from qiskit import ClassicalRegister, QuantumCircuit, QuantumRegister
import numpy as np

"""2023/05/24"""
def t_gate_ipe_circuit(qr: QuantumRegister, cr: ClassicalRegister) -> QuantumCircuit:
    # qr is a quantum register with 2 qubits
    # cr is a classical register with 3 bits

    qc = QuantumCircuit(qr, cr)

    ####### your code goes here #######
    m = 3 # 使用する量子ビットの数

    """最初のステップ"""
    qc.h(qr[0])
    qc.x(qr[1])
    qc.cp(np.pi, qr[0], qr[1])
    qc.h(qr[0])
    qc.measure(qr[0], cr[0])

    """2回目のステップ"""
    # 初期化
    qc.reset(qr[0])
    qc.h(qr[0])

    # Z軸周りの角度wの回転で位相補正
    with qc.if_test((cr[0], 1)):
        qc.p(-2*np.pi/(2**2), qr[0])
        # qc.p(-np.pi/2, qr[0])

    # 制御Uを適用
    qc.cp(np.pi/(2**(m-2)), qr[0], qr[1])

    # X基底でq0を測定
    qc.h(qr[0])
    qc.measure(qr[0], cr[1])

    """3回目のステップ"""
    # 初期化
    qc.reset(qr[0])
    qc.h(qr[0])

    # Z軸周りの角度wの回転で位相補正
    with qc.if_test((cr[0], 1)):
        qc.p(-2*np.pi/(2**3), qr[0])
        # qc.p(-np.pi/4, qr[0])
    with qc.if_test((cr[1], 1)):
        qc.p(-2*np.pi/(2**2), qr[0])
        # qc.p(-np.pi/2, qr[0])

    # 制御Uを適用
    qc.cp(np.pi/(2**(m-1)), qr[0], qr[1])

    # X基底でq0を測定
    qc.h(qr[0])
    qc.measure(qr[0], cr[2])

    return qc

qr = QuantumRegister(2, "q")
cr = ClassicalRegister(3, "c")
qc = QuantumCircuit(qr, cr)
qc = t_gate_ipe_circuit(qr, cr)
qc.draw("mpl")

Exercise 4
step1_bit: int

####### your code goes here #######
step1_bit = 0
if counts['1'] >= 8:
    step1_bit = 1

print(step1_bit)
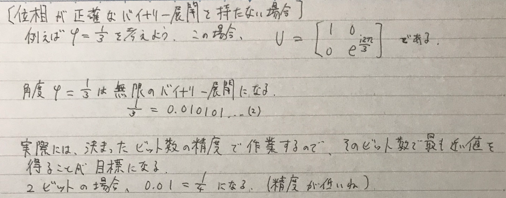
Exercise 5

問題文の意味が把握しづらかったが、「最初のビットは常に正しい値を測定するようにする」=「1を測定するようにする」とエスパーしたら通った。
from qiskit import ClassicalRegister, QuantumCircuit, QuantumRegister
import numpy as np


def u_circuit(qr: QuantumRegister, cr: ClassicalRegister) -> QuantumCircuit:
    # qr is a quantum register with 2 qubits
    # cr is a classical register with 2 bits

    qc = QuantumCircuit(qr, cr)

    ####### your code goes here #######
    q0, q1 = qr
    c0, c1 = cr

    # Initialization
    qc.x(q0)
    qc.x(q1)
    qc.measure(q0, c0)

    """2ビット目を測定するための回路"""
    # Initialization
    qc.reset(q0)
    qc.h(q0)
    with qc.if_test((c0, 1)):
        qc.p(-np.pi / 2, q0)

    # Apply control-U operator as many times as needed to get the least significant phase bit
    # u_angle = 2 * np.pi / 3
    u_angle = np.pi / 12
    k = 2
    cphase_angle = u_angle * 2**k
    qc.cp(cphase_angle, q0, q1)

    # Measure the auxiliary qubit in x-basis
    qc.h(q0)
    qc.measure(q0, c1)

    return qc


qr = QuantumRegister(2, "q")
cr = ClassicalRegister(2, "c")
qc = QuantumCircuit(qr, cr)
qc = u_circuit(qr, cr)
qc.draw("mpl")
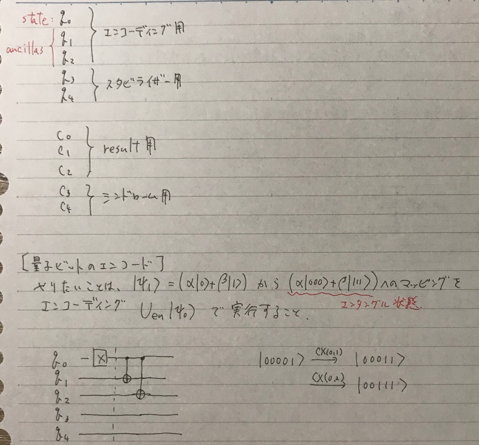
Lab 4
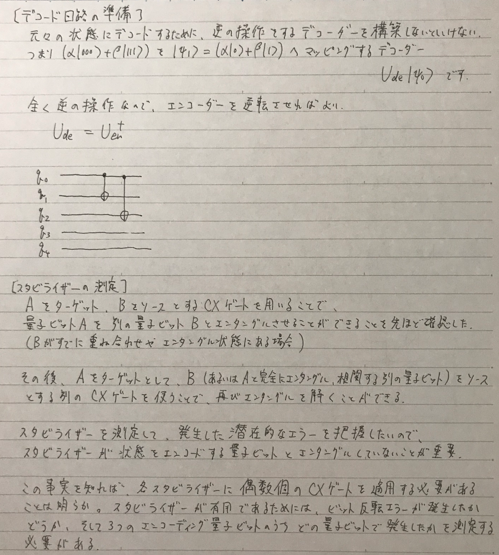
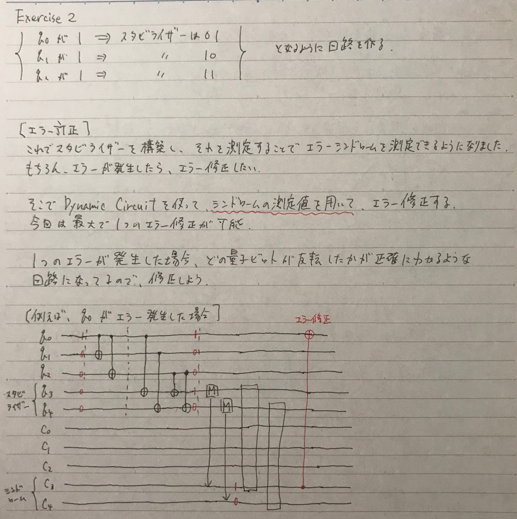
エラー訂正のLab。
Exercise 1
# Creating a simple decoder for the classical case
def create_decoder(qr: QuantumRegister, cr: ClassicalRegister) -> QuantumCircuit:
    # Expect a bit being encoded in the first 3 qubits and decode it into the 4th qubit
    # Make sure values of the first 3 qubit stays the same

    qc = QuantumCircuit(qr, cr)
    q0, q1, q2, q3 = qr
    (c0,) = cr

    ####### your code goes here #######
    # (q2,q1,q0) のうちに2個以上1があったら q3を|1>にする。
    # 制御ゲートccxを使えばOK
    qc.ccx(q0,q1,q3)
    qc.ccx(q1,q2,q3)
    qc.ccx(q2,q0,q3)

    return qc
Exercise 2
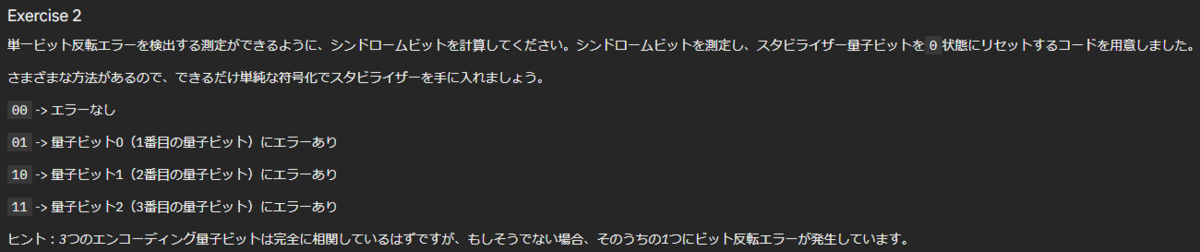
# Add functions such that the classical bits can be used to see which qubit is flipped in the case a single qubit is flipped.
# Use 2 classical bits for it.
# 0 = 00 = no qubit flipped
# 1 = 01 = first qubit (qubit 0) flipped
# 2 = 10 second qubit (qubit 1) flipped
# 3 = 11 = third qubit (qubit 2) flipped
def measure_syndrome_bit(qc, encoding, stabilizer):
    qc.barrier()
    encoding_q0, encoding_q1, encoding_q2 = encoding
    stabilizer_q0, stabilizer_q1 = stabilizer

    ####### your code goes here #######
    # q0が反転(1)していたらスタビライザーが01になるようにする
    qc.cx(encoding_q0, stabilizer_q0)

    # q1が反転(1)していたらスタビライザーが10になるようにする
    qc.cx(encoding_q1, stabilizer_q1)

    # q2が反転(1)していたらスタビライザーが11になるようにする
    qc.cx(encoding_q2, stabilizer_q0)
    qc.cx(encoding_q2, stabilizer_q1)

    ####### don't edit the code below #######
    qc.barrier()
    qc.measure(stabilizer, syndrome)
    with qc.if_test((syndrome_b0, 1)):
        qc.x(stabilizer_q0)
    with qc.if_test((syndrome_b1, 1)):
        qc.x(stabilizer_q1)

    return qc


syndrome_circuit = measure_syndrome_bit(initialize_circuit(), encoding, stabilizer)

complete_circuit = initial_state.compose(encoding_circuit).compose(syndrome_circuit)
complete_circuit.draw("mpl")

Exercise 3

if_test で条件分岐すればOK。
# Correct the errors, remember how we encoded the errors above!
def apply_correction_bit(qc, encoding, syndrome):
    qc.barrier()
    encoding_q0, encoding_q1, encoding_q2 = encoding

    ####### your code goes here #######
    syndrome_b0, syndrome_b1 = syndrome
    with qc.if_test((syndrome_b0, 0)) as else0:
        with qc.if_test((syndrome_b1, 0)) as else1:
            # シンドロームが00の場合
            pass
        with else1:
            # シンドロームが10の場合、q1をエラー訂正
            qc.x(encoding_q1)
    with else0:
        with qc.if_test((syndrome_b1, 0)) as else1:
            # シンドロームが01の場合、q0をエラー訂正
            qc.x(encoding_q0)
        with else1:
            # シンドロームが11の場合、q2をエラー訂正
            qc.x(encoding_q2)

    return qc


correction_circuit = apply_correction_bit(initialize_circuit(), encoding, syndrome)
complete_circuit = (
    initial_state.compose(encoding_circuit)
    .compose(syndrome_circuit)
    .compose(correction_circuit)
)
complete_circuit.draw(output="mpl")

Exercise 4


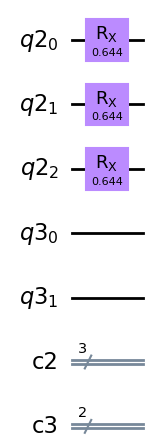
# Add some errors as defined above (only add errors to the encoding qubits)
def make_some_noise(qc, encoding, syndrome, error_percentage):
    encoding_q0, encoding_q1, encoding_q2 = encoding
    syndrome_b0, syndrome_b1 = syndrome

    ####### your code goes here #######
    p = error_percentage/100
    q = 1 - p
    theta = math.acos(math.sqrt(q))*2

    # q0の確率的エラー回路
    qc.rx(theta, encoding_q0)

    # q1の確率的エラー回路
    qc.rx(theta, encoding_q1)

    # q2の確率的エラー回路
    qc.rx(theta, encoding_q2)

    return qc


# Constructing a circuit with 10% error rate (for each of the encoding qubit)
noise_circuit = make_some_noise(initialize_circuit(), encoding, syndrome, 10)
noise_circuit.draw(output="mpl")
Lab 5
127量子ビットを使ってDHZ状態を作ろうのLab。
Exercise 1

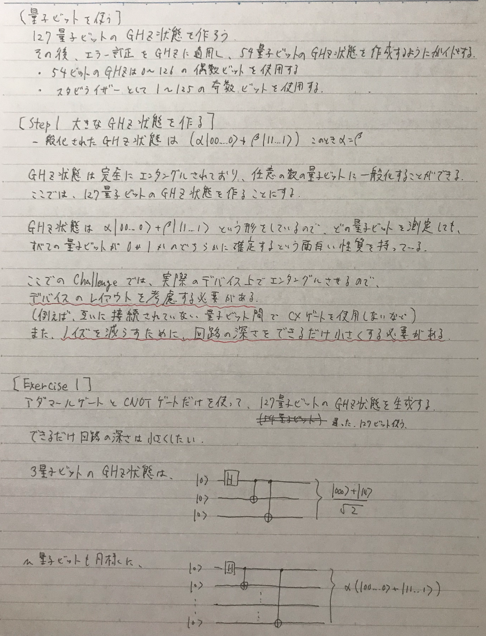
すべての量子ビットが互いに接続されているなら、ナイーブに実装すればOK。
"""すべての量子ビットが互いに接続されているバージョン"""
def generate_ghz127():
    qc = QuantumCircuit(quantum_register, classical_register)

    ####### your code goes here #######
    qc.h(ghz_qubits[0])

    for idx in range(1, 127):
        qc.cx(0, idx)

    return qc


ghz_circuit = generate_ghz127()
print(ghz_circuit.depth())
# 127
しかしこの問題はレイアウトを考慮して実装しなければならない。レイアウトは以下である。

CNOTゲートを数珠つなぎで適用させるイメージで、エンタングルを作ることができる。
実装は以下のようになった。
"""実機デバイスの接続状態を考慮バージョン"""
def generate_ghz127():
    qc = QuantumCircuit(quantum_register, classical_register)

    ####### your code goes here #######
    qc.h(ghz_qubits[0])

    # 隣同士のcxゲートをつなげてエンタングルメントを伝播させる
    for i in range(0,13):
        qc.cx(i,i+1)
    qc.cx(0,14)
    qc.cx(4,15)
    qc.cx(8,16)
    qc.cx(12,17)
    qc.cx(14,18)
    for i in range(18,32):
        qc.cx(i,i+1)
    qc.cx(20,33)
    qc.cx(24,34)
    qc.cx(28,35)
    qc.cx(32,36)
    qc.cx(36,51)
    for i in range(51,37,-1):
        qc.cx(i,i-1)
    qc.cx(37,52)
    qc.cx(41,53)
    qc.cx(45,54)
    qc.cx(49,55)
    qc.cx(52,56)
    for i in range(56,70):
        qc.cx(i,i+1)
    qc.cx(58,71)
    qc.cx(62,72)
    qc.cx(66,73)
    qc.cx(70,74)
    qc.cx(74,89)
    for i in range(89,75,-1):
        qc.cx(i,i-1)
    qc.cx(75,90)
    qc.cx(79,91)
    qc.cx(83,92)
    qc.cx(87,93)
    qc.cx(90,94)
    for i in range(94,108):
        qc.cx(i,i+1)
    qc.cx(96,109)
    qc.cx(100,110)
    qc.cx(104,111)
    qc.cx(108,112)
    qc.cx(112,126)
    for i in range(126,113,-1):
        qc.cx(i,i-1)
    return qc


ghz_circuit = generate_ghz127()
print(ghz_circuit.depth())
# 97
回路の深さも短くなったのでヨシ。
Exercise 2


アンエンタングル(エンタングルを解除)するには、アンエンタングルしたいビットをターゲットに、CNOTゲートを再度適用させればよい。
"""実機デバイスの接続状態を考慮バージョン"""
def deentangle_qubits():
    qc = QuantumCircuit(quantum_register, classical_register)

    ####### your code goes here #######
    # スタビライザーのエンタングルメントをキャンセルする
    for i in range(0,13,2):
        qc.cx(i,i+1)
    qc.cx(0,14)
    qc.cx(4,15)
    qc.cx(8,16)
    qc.cx(12,17)
    for i in range(18,32,2):
        qc.cx(i,i+1)
    qc.cx(20,33)
    qc.cx(24,34)
    qc.cx(28,35)
    qc.cx(32,36)
    for i in range(51,37,-2):
        qc.cx(i,i-1)
    qc.cx(37,52)
    qc.cx(41,53)
    qc.cx(45,54)
    qc.cx(49,55)
    for i in range(56,70,2):
        qc.cx(i,i+1)
    qc.cx(58,71)
    qc.cx(62,72)
    qc.cx(66,73)
    qc.cx(70,74)
    for i in range(89,75,-2):
        qc.cx(i,i-1)
    qc.cx(75,90)
    qc.cx(79,91)
    qc.cx(83,92)
    qc.cx(87,93)
    for i in range(94,108,2):
        qc.cx(i,i+1)
    qc.cx(96,109)
    qc.cx(100,110)
    qc.cx(104,111)
    qc.cx(108,112)
    for i in range(126,113,-2):
        qc.cx(i,i-1)

    return qc


unentangle_circuit = deentangle_qubits()
print(unentangle_circuit.depth())
# 2

complete_circuit = ghz_circuit.compose(unentangle_circuit)
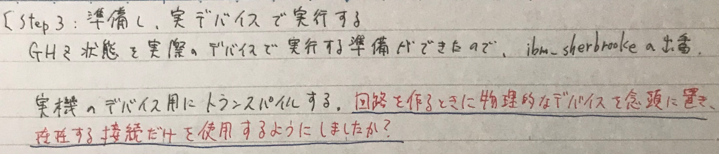
最終的に実機デバイスで動くように回路をトランスパイルしたqc_transpiledの深さは以下になった。
# First we transpile the GHZ-state for the actual device
qc_transpiled = transpile(simple_ghz, backend, initial_layout=initial_layout)

qc_transpiled.depth()
# 277
Discordを見ると56くらいにしてる猛者がいた。
Exercise 3


data は以下の形式のデータが与えられるので、GHZ状態がどのくらい「良い」のか評価関数を作れという問題。
fakedata=['0001010000000001000000001110100110100101110110111101011010110101100110100111010110101111001010000001011000000010000001111100000',
 '1011000001101000001010101001101100100101001101001100111000101010101110100001010101010101010011101010110010101001001010111000101',
 '1001101010101001001010101010101010000101011011010101000010101010101010110111101101010110000000101010101010101010001011010100101',
 '1010110110101000001010100010101010010101010101011101001010111010110010110110001101010110001000101010101011001000001011010110001',
 '0000000000000000000000011001100110100000001110001101000000000000000010110101010100011000001000000011110000000010000000010000000',
 '1010101010101000001010101010101100010101001011011001010010101011000010100101010101010101010000000110101010101000001001111010101',
 '1010101111000000001010101011111010010101010101010100100000001011010110100000000001101101011010101010101001101011001011010000011',
 '0000011011000010011100011011100110010101000000001101000010101000011110100011010100100000001001000000000000001010000000001100000']
# A function to test the quality of a GHZ-state. The lower the better
def test_ghz(data):
    ghz_qubits = [
        0,
        2,
        4,
        6,
        8,
        10,
        12,
        18,
        20,
        22,
        24,
        26,
        28,
        30,
        32,
        37,
        39,
        41,
        43,
        45,
        47,
        49,
        51,
        56,
        58,
        60,
        62,
        64,
        66,
        68,
        70,
        75,
        77,
        79,
        81,
        83,
        85,
        87, # Errata
        89,
        94,
        96,
        98,
        100,
        102,
        104,
        106,
        108,
        114,
        116,
        118,
        120,
        122,
        124,
        126,
    ]

    ####### your code goes here #######
    # GHZ状態がどれほど「良い」か?
    # 理想的なGHZ状態は、ghz_qubitsのどれか1だったらすべて1、どれか0だったらすべて0
    # なので、以下のような方針になる
    # - ghz_qubitsの54ビットがすべて1 => 最良
    # - ghz_qubitsの54ビットがすべて0 => 最良
    # - ghz_qubitsの27ビットが0、27ビットが1 => 最悪
    ans = 0
    for i in range(len(data)):
        # 0と1の個数を数える
        one_num, zero_num = 0, 0
        for idx in ghz_qubits:
            if data[i][idx] == "0":
                zero_num += 1
            else:
                one_num += 1

        # 評価関数は、one_numとzero_numが同数に近ければ値が大きく、離れていたら値が小さくなるようにする
        eval = min(zero_num, one_num) / max(zero_num, one_num)
        ans += eval

    # 評価値の平均を返す
    ans /= len(data)
    return ans

# !!!!! fakedata !!!!!
# data = fakedata
test_ghz(data)