実行スクリプトの親ディレクトリのファイルをインポートする - Pythonで遊ぶよ - pythonグループ
長年これを探していました…!
├hoge.py
└tests/
└test_hoge.py
test_hoge.pyからhoge.pyをインポートします。
test_hoge.py
import os
import sys
sys.path.append(os.pardir)
import hoge
hoge1.serviceとhoge2.serviceという2つのサービスを作成しました。
「hoge1.seriveのExecStartで指定したスクリプトが完全に終了してからhoge2.serviceを起動する」ということをしたい場合は、サービスの起動順序を記述する必要があります。
[Unit]セクションにAfterとBeforeを記述すれば起動順序を指定できますが、これだけだと意図した順序で起動してくれませんでした。
原因は起動完了判定のタイミングで、[Service]セクションのTypeも考える必要があります。
Type = simpleは、「サービス起動と同時に起動完了と判定する」
Type = oneshotは、「サービス起動して、ExecStartで指定したスクリプトが終了したら起動完了と判定する」
Systemd入門(4) - serviceタイプUnitの設定ファイル - めもめも
なので、今回のような場合はhoge1.serviceをType = oneshotにする必要があります。
hoge1.service
[Unit]
Description = hoge1.sh runs before hoge2.sh
Wants = multi-user.target
Before = hoge2.service

[Service]
ExecStart = /home/pi/hoge1.sh
Restart = no
Type = oneshot

[Install]
WantedBy = multi-user.target
hoge2.service
[Unit]
Description = hoge2.sh runs after hoge1.sh
After = hoge1.service

[Service]
ExecStart = /home/pi/hoge2.sh
Restart = no
Type = simple

[Install]
WantedBy = multi-user.target
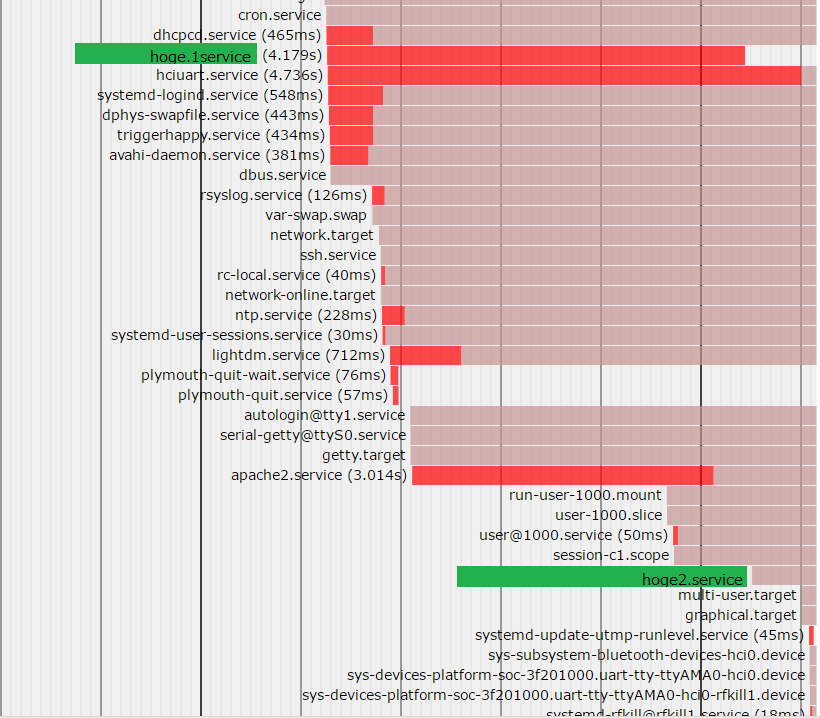
実際に意図した順序で起動しているかを確認してみます。
Systemdのサービスの依存関係を調べる方法 - ククログ(2015-12-28)
$ systemd-analyze plot > systemd.svg
作成されたsystemd.svgファイルを適当なブラウザにドラッグ&ドロップすると、デーモンの起動順序を確認できます。

hoge1.serviceの後にhoge2.serviceがactiveしていることがわかります。
どうやらこれで良さそうです:)
・Ubuntu14.04 LTS
・pyenvを使ってAnaconda4.3.0 (python3.6.0)をインストール
で、fcntlモジュールのflock()等が使用できません。
" AttributeError: module 'fcntl'has no attribute "エラーが起きます。
$ python
Python 3.6.0 |Anaconda 4.3.0 (32-bit)| (default, Dec 23 2016, 12:22:10)
[GCC 4.4.7 20120313 (Red Hat 4.4.7-1)] on linux
Type "help", "copyright", "credits" or "license" for more information.
>>> import fcntl
>>> fcntl.LOCK_EX
Traceback (most recent call last):
  File "<stdin>", line 1, in <module>
AttributeError: module 'fcntl' has no attribute 'LOCK_EX'
>>>
なぜ?
調べると、同じディストリビューションで困っている人を発見しました。
Python 3.6になったAnaconda 4.3.0をインストールしてはまった - Qiita
下のChangelogにあるようにいくつかパッケージが外されている。どのパッケージが該当するのかはっきりしないが、いくつか機能がなくなっている。
パッケージが外されている……いやしかし、標準ライブラリのモジュールを外すことってありえるのかな?と疑問。もしかしたらこの人とは関係ないかも?
Anaconda4.3.0のChangelogを眺めてみました。
Anaconda changelog | Continuum Analytics: Documentation
Removed (from installer only):
anaconda-clean
dynd-python
filelock <==
libdynd
nb_anacondacloud
nb_conda
nb_conda_kernels
nbpresent
patchelf
pkginfo
filelock...?うーん……。
ちなみに、システムにプリインストールされているpython2.7.6とpython3.4.3だと普通に使用できます。
$ python2
Python 2.7.6 (default, Jun 22 2015, 18:00:18)
[GCC 4.8.2] on linux2
Type "help", "copyright", "credits" or "license" for more information.
>>> import fcntl
>>> fcntl.LOCK_EX
2
>>>
$ /usr/bin/python3
Python 3.4.3 (default, Oct 14 2015, 20:33:09)
[GCC 4.8.4] on linux
Type "help", "copyright", "credits" or "license" for more information.
>>> import fcntl
>>> fcntl.LOCK_EX
2
>>>
root@raspberrypi:~# systemctl status mydaemon.service       -l
● mydaemon.service - This is my daemon
Loaded: loaded (/etc/systemd/system/mydaemon.service; enabled)
Active: failed (Result: exit-code) since 木 2017-02-09 17:01:27 JST; 1s ago
Process: 1587 ExecStart=/root/hoge_task/hoge_task.sh (code=exited, status=203/EXEC)
Main PID: 1587 (code=exited, status=203/EXEC)
2月 09 17:01:27 raspberrypi systemd[1]: Started This is my daemon.
2月 09 17:01:27 raspberrypi systemd[1]: mydaemon.service: main process exited, code=exited, status=203/EXEC
2月 09 17:01:27 raspberrypi systemd[1]: Unit mydaemon.service entered failed state.
systemctl statusを見てもエラーの原因はわかりません。こういうときはsyslogを見ます。
$ less /var/log/syslog
(略)
Feb  9 14:20:57 raspberrypi systemd[416]: Failed at step EXEC spawning /root/hoge_task/hoge_task.py: Permission denied
Permission denied...権限がないと言われています。
確認してみるとhoge_task.shの権限は644でした。実行権限を与えます。
$ chmod 744 /root/hoge_task/hoge_task.sh
再度チャレンジ。
$ systemctl start mydaemon
$ systemctl status mydaemon
● mydaemon.service - This is my daemon.
   Loaded: loaded (/etc/systemd/system/mydaemon.service; enabled)
   Active: active (running) since 木 2017-02-09 17:07:56 JST; 7min ago
 Main PID: 416 (hoge_task)
成功しました。
デーモンのエラーはとりあえずsyslogを見ましょうという教訓でした。
Raspberry Pi 3で、apt-get updateをすると、次のようなメッセージが表示されました。
インデックスファイルのダウンロードに失敗、アップデートが正常に出来なくなりました
ちょっと前まではできていたのに?
思いあたる節はIPアドレスを固定にしたことくらい。
/etc/dhcpcd.conf
interface wlan0
static ip_address=192.168.5.31/24
#static routers=192.168.5.254
#static domain_name_servers=125.173.93.22
固定IPアドレスにするだけだったのでルータとDNSサーバの指定はしなくてもいいと思っていたけど、もしかして固定IPアドレスにした場合はDNSサーバも指定しないとだめかもしれない?
/etc/dhcpcd.conf
interface wlan0
static ip_address=192.168.5.31/24
static routers=192.168.5.254
static domain_name_servers=125.173.93.22
Raspberry Pi 3のRaspbian ver.8.0(Jessie)ではrc.localが非推奨となり、デフォルトで使用できなくなりました。
起動時にスクリプトを実行させたい場合、これからはsystemdを使いましょうとのことです。
systemdについての概要記事
http://equj65.net/tech/systemd-boot/
大体わかったような気がしたところで、とりあえず人のサンプルプログラムを動かしてみましょう。
http://qiita.com/DQNEO/items/0b5d0bc5d3cf407cb7ff
うまくいきました。
このサンプルプログラムを改造すればrc.localと同様の処理が実現できるというわけですね。少しずついじっていきましょう。少しずついじって…さっそくデーモンエラーが起きました。
$ systemctl -l status hello
● hello.service - hello daemon
   Loaded: loaded (/etc/systemd/system/hello.service; enabled)
   Active: failed (Result: start-limit) since 木 2017-01-26 14:58:38 JST; 2min 5
4s ago
 Main PID: 665 (code=exited, status=0/SUCCESS)

 1月 26 14:58:38 raspberrypi systemd[1]: hello.service holdoff time over, schedu
ling restart.
 1月 26 14:58:38 raspberrypi systemd[1]: Stopping hello daemon...
 1月 26 14:58:38 raspberrypi systemd[1]: Starting hello daemon...
 1月 26 14:58:38 raspberrypi systemd[1]: hello.service start request repeated to
o quickly, refusing to start.
 1月 26 14:58:38 raspberrypi systemd[1]: Failed to start hello daemon.
 1月 26 14:58:38 raspberrypi systemd[1]: Unit hello.service entered failed state
.
hello.service start request repeated too quickly, refusing to start.
「高速でリクエストを繰り返しすぎ」エラーのようです。
$ sudo vi /etc/systemd/system/hello.service
[Unit]
Descripton = hello daemon

[Service]
ExecStart = /opt/hello.sh
Restart = always
Type = simple

[Install]
WantedBy = multi-user.target
どうやら、Restart = alwaysが怪しいですね。
今、hello.shの中身は次のようになっています。
#!/bin/sh
echo Hello World >> /tmp/hello.log
このスクリプトが短すぎてすぐに処理が終わり、すぐにまたデーモンにリクエストがいっているせいでエラーが起きているようです。
Restart = noに書き換えてみましょう。
$ sudo vi /etc/systemd/system/hello.service
[Unit]
Descripton = hello daemon

[Service]
ExecStart = /opt/hello.sh
Restart = no
Type = simple

[Install]
WantedBy = multi-user.target
書き換えたら、hello.serviceを再度実行してみましょう。
$ sudo systemctl daemon-reload
$ sudo systemctl start hello
$ sudo systemctl status hello
● hello.service - hello daemon
   Loaded: loaded (/etc/systemd/system/hello.service; enabled)
   Active: inactive (dead) since 木 2017-01-26 15:44:25 JST; 2min 18s ago
  Process: 1006 ExecStart=/opt/hello.sh (code=exited, status=0/SUCCESS)
 Main PID: 1006 (code=exited, status=0/SUCCESS)

 1月 26 15:44:25 raspberrypi systemd[1]: Started hello daemon.
エラーが消えました。
hello.shを一回だけ実行したあと、inactiveになっています。
これでOKということで。
ルータに繋がらないなあと思っていたら、WPAじゃなくてWEPでした。大丈夫かなこの施設…
やり方はここのサイトの一番下に書いてありました。
https://www.freebsd.org/cgi/man.cgi?query=wpa_supplicant.conf&sektion=5&apropos=0&manpath=NetBSD+6.1.5
ラズパイが接続可能なアクセスポイントは、スキャンすることで見つかります
$ sudo iwlist wlan0 scan >> hoge.txt
$ less hoge.txt
ルータの情報は以下と仮定します。
SSID:MY_SSID
パスワード:HereIsPassword
Raspberry Pi 3のネットワーク情報はwpa_supplicant.confファイルを編集するらしいです。
(WEPで接続するのにwpa_supplicant.confを編集していいものか…まあいいや)
$ sudo vi /etc/wpa_supplicant/wpa_supplicant.conf

country=JP
ctrl_interface=DIR/var/run/wpa_supplicant GROUP=netdev
update_config=1

network={
   ssid="MY_SSID"
   scan_ssid=1
   key_mgmt=NONE
   wep_tx_keyidx=0
   wep_key0=HereIsPassword
}
【2021/08/30追記】
Traditional WEP configuration with 104 bit key specified in hexadecimal.
Note the WEP key is not quoted.
wep_key0は、ダブルクオーテーションで囲まないことに注意してください。
【2021/08/30追記終わり】
scan_ssidとwep_tx_keyidxの意味はよくわかってないけれど、接続できました。